Getting started with Dynamic Verify: Mobile App
Thanks for visiting the Ducharme Dynamic Verify Knowledge Base. This is the first port of call for those frequently asked questions on how to navigate and utilise Dynamic Verify.
:DUCHARME_HIRES: Introduction
Ducharme Dynamic Verify is a Movable Asset Verification e-solution, to verify GRAP/IPSAS moveable asset data. The app is developed for Android devices. It makes use of web-based 3G wireless technology to allow entities to capture and verify movable assets 'on the go' as part of their asset management processes.
We assist with the upload of your entity's asset hierarchy and component details, which syncs with the cloud database. Your verification team scans the asset barcodes and verifies these asset details and captures photos, GIS details, and condition assessment data. The data can be exported for asset calculations. The system provides for verification reports and room listings.
Our solution is based on the number of assets and not the number of users. This provides for effective costing, whilst gaining maximum verification team sizes.
The app does not require specialised devices and can run on standard smartphones/tablets with auto-focus camera abilities, saving investment in once-off use assets.
Ducharme Dynamic Verify allows for a more time and cost effective movable asset verification process than the traditional pen-&-paper method.
:DUCHARME_HIRES: Getting Started
Start by hitting the Login button and entering your credentials, you will be directed to your Dashboard.

:DUCHARME_HIRES: Verifying an Existing Asset
To verify an existing asset, simply-
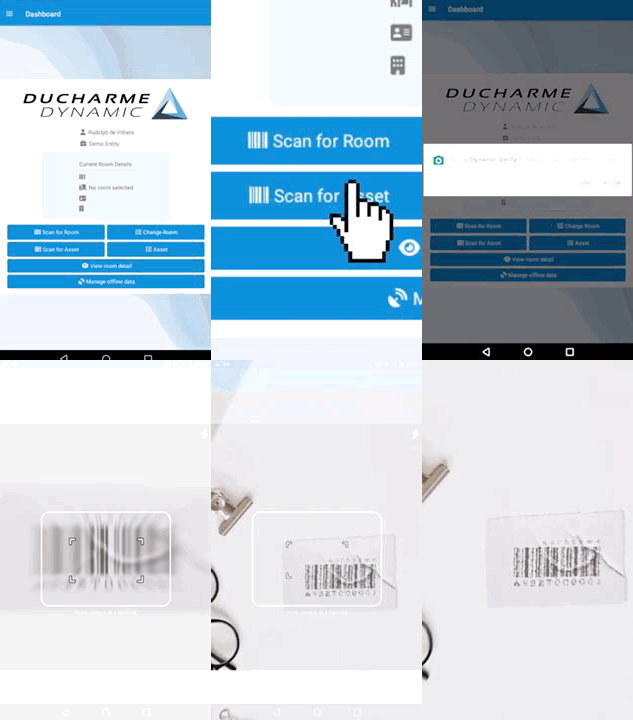
Hit the Scan for Asset button
Grant the Application permission to use your device’s camera
Hover your camera over the asset’s barcode (within the white frame)

Make sure the barcode is clearly visible. If the scanner takes unusually long, try activating the flash.
:DUCHARME_HIRES: Adding a New Asset
To add a new asset-
Repeat steps (1-3) of :DUCHARME_HIRES: Verify an Existing Asset
Hit Yes when asked whether you would like to add a new asset with your scanned barcode
Fill in the following attributes:
Asset details & specifications [make, model, colour, material, Asset number; description; serial number]
A photograph of each verified asset
GPS reading [Reading to comply with GIS system reading requirements]
Asset location details: Physical address of the asset/street name and number
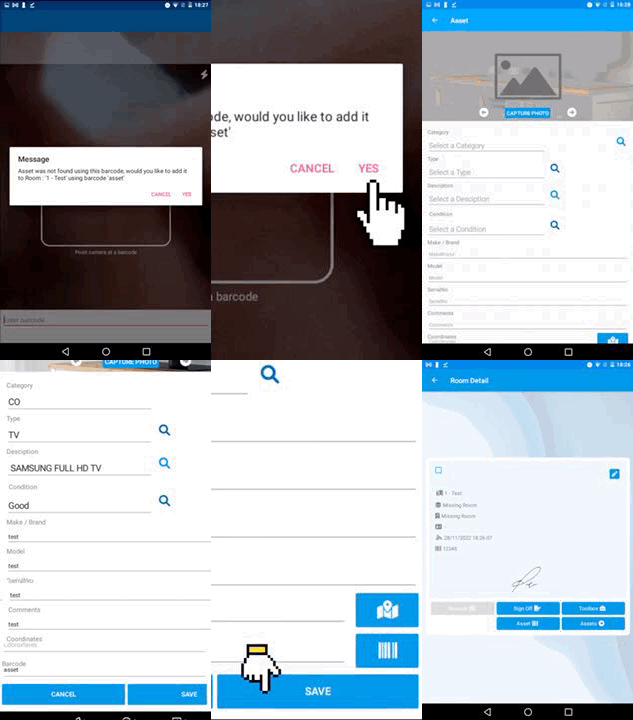

You are required to fill in every field before being able to add the asset.
:DUCHARME_HIRES: Adding a New Room
In order to add/verify assets, the room in which the asset exists must be selected. If the room is not preloaded on the system, you will have to manually add it. To do so simply-
Select Scan for Room from the home screen
Point your device’s camera at the room’s barcode until it scans, or manually enter the barcode at the bottom of the screen.
a Dialog box containing “Warning: Room was not found using this barcode, would you like to add it using barcode ‘12345678’” will pop up, hit YES
On the next page you will be asked to add all of the necessary descriptors of the room, these are all key in the verification process.
Once you have entered all of the required fields, hit Save
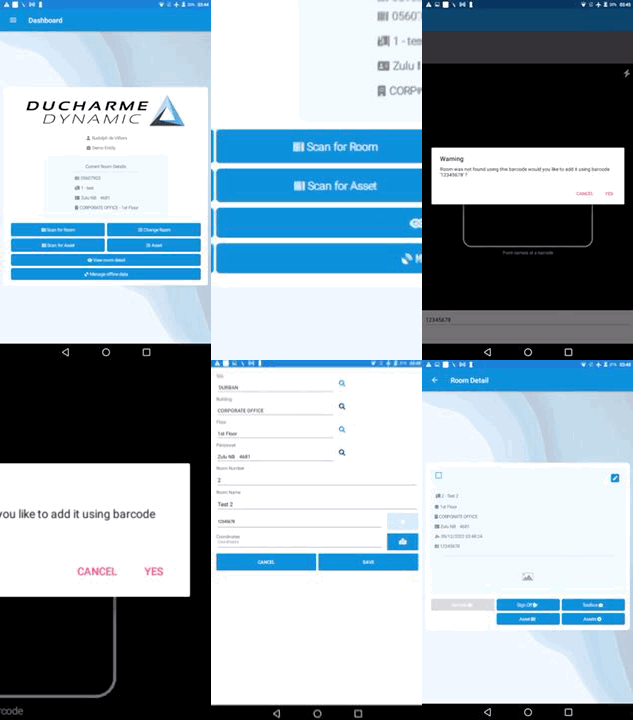
Should you scan an asset without prior selection of the correct room, you will also be prompted to go through the above-mentioned process.
:DUCHARME_HIRES: Changing Rooms
To switch to a different room:
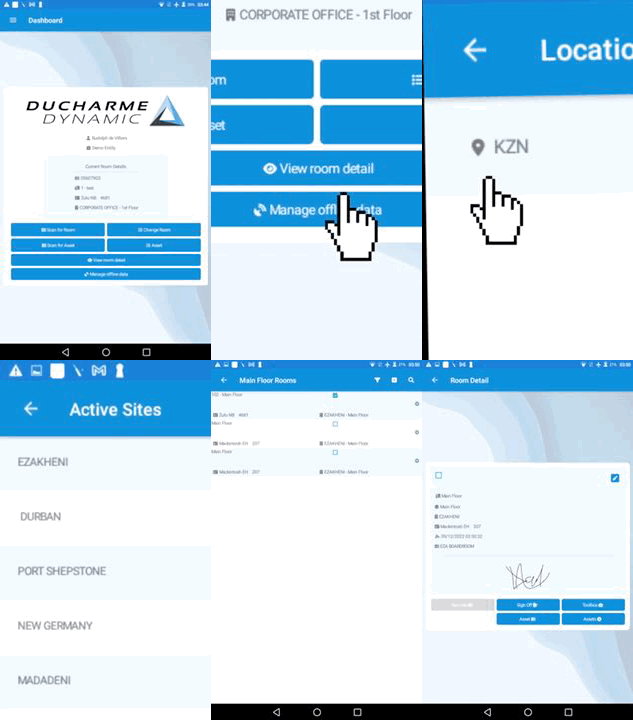
Hit Change Room from the home screen
Select the Province in which the site is based
Each province has a multitude of Sites within it, tap on yours
Every site contains several Buildings/offices, tap on yours
If applicable, select a building Floor
Finally, choose the Room
:DUCHARME_HIRES: Viewing and Editing Room Information
To view and if necessary, edit data pertaining to a room, simply-
Hit View Room Details from the home screen
If you had not already selected a room to work in, you will be met with a pop-up message asking whether you would like to select a room to view. Hit Yes
Select the Province in which the site is based
Each province has a multitude of Sites within it, tap on yours
Every site contains several Buildings/offices, tap on yours
If applicable, select a building Floor
Choose your Room
You should now be on the Room Detail page, to edit any of the descriptors, hit the blue pencil icon in the top right hand corner
Once you have made the necessary changes, hit Sign Off
Sign above the line, and hit Save Signature
Should you have difficulty signing with your finger, hit “Upload Signature as Image”
(gif here)
:DUCHARME_HIRES: Viewing and Downloading Offline Data
Dynamic Verify stores all necessary data pertaining to every site on its own server. This data is available to download should it be necessary to view said data at a later time- with or without a data signal.